自动化测试
Ren’Py 允许创作者在游戏中加入自动化测试,以确保对游戏的修改不会破坏已有功能;对大型游戏或经常更新的游戏尤其有用。
测试系统的两个主要组成部分是 testcase 和 testsuite 语句。
renpy.is_in_test() 函数可用于判断当前是否正在执行测试。
快速入门
本节内容通过一个最小化样例,展示在实际测试用例中常用的语句:
run Jump("...")从一个已知的脚本标签开始运行。advance until screen "choice"自动前进直到出现某个分支选项菜单。click "Choice Text"选择某个选项。click id "..." until not screen "..."不断鼠标点击直到某个界面消失。.
首先,将下列代码加入到需要自动化测试的游戏脚本中:
screen quickstart_popup():
    modal True

    frame:
        xalign 0.5
        yalign 0.5

        vbox:
            spacing 12
            text "快速入门弹窗"

            textbutton "关闭":
                id "quickstart_close"
                action Hide("quickstart_popup")


label quickstart_demo:
    "欢迎来到测试用例快速入门demo。"

    show screen quickstart_popup
    "关闭弹窗并继续。"

    menu:
        "拿走地图":
            "你拾取了地图。"
        "离开":
            "你不管地图并走开了。"

    "demo结束。"
    return
接着,添加测试用例(testcase)并执行上述代码,验证运行结果是否符合预期。
可以把测试用例跟前面的代码放在同一个脚本文件中,也可以放在不同文件中。例如,新建一个名为 testcases.rpy 的文件放测试用例。
testsuite quick_start:
    before testcase:
        run Jump("quickstart_demo")
        advance until screen "quickstart_popup"

    testcase choose_map:
        pause 0.5
        click id "quickstart_close" until not screen "quickstart_popup"
        pause 0.5
        advance until screen "choice"
        click "拿走地图"
        advance until "你拾取了地图。"
        pause 0.5

    testcase leave_map:
        pause 0.5
        click id "quickstart_close" until not screen "quickstart_popup"
        pause 0.5
        advance until screen "choice"
        click "离开"
        advance until "你不管地图并走开了。"
        pause 0.5
Note
demo中的pause语句不是必须的,它们只是能让人看清测试过程。实际使用时完全可以删除pause部分让测试运行更快。
保存文件后,参考 运行测试用例 的内容在启动器或命令行中运行测试用例。 如果选择在命令行中运行测试,可以使用下列命令:
./renpy.sh /path/to/game test quick_start
.\lib\py3-windows-x86_64\python.exe renpy.py C:\path\to\game test quick_start
运行测试用例
启动器运行
如果从启动器运行测试,选中需要测试的项目,然后点击“Run Testcases”按钮。 如果看不到这个按钮,请尝试下列操作:
确保游戏项目中至少包含一个测试用例(testcase)。
点击“启动项目”按钮正常启动游戏。
点击启动器的“刷新”按钮。
默认情况下,这样会运行“global”测试套件。
命令行运行
如果在命令行模式运行测试,就打开一个终端窗口并把路径切换到Ren’Py的SDK目录,然后使用 test命令 :
cd /path/to/renpy
./renpy.sh <basedir> test [<testcase>] [options...]
cd C:\path\to\renpy
.\lib\py3-windows-x86_64\python.exe renpy.py <basedir> test [<testcase>] [options...]
- <basedir>
指定项目路径。
- <testcase>
指定运行的测试用例或测试套件。若未指定,默认运行“global”测试套件。
- --enable_all
运行所有测试用例和测试套件,忽略它们的
enabled设置。
- --overwrite_screenshots
执行 screenshot语句 将覆盖已存在的同名截屏图片。
- --hide-header
开始运行测试时禁用header部分。
- --hide-execution {no|hooks|testcases|all}
隐藏测试执行的相关信息。
--hide-execution hooks隐藏hook信息,--hide-execution testcases隐藏测试用例和hook,--hide-execution all隐藏所有测试信息。
- --hide-summary
禁用测试运行完的总结。
- --report-detailed
运行测试时显示每项测试的详细信息。
- --report-skipped
显示跳过的测试的信息。该选项应与
--report-detailed一起使用。
testcase语句
testcase 语句用于创建一个具名测试用例,每个用例包含一块测试语句(见下文)。
测试用例与 Ren’Py 的 label 类似,但有如下区别:
Ren’Py 的 label 语句包含 Ren’Py 代码,而testcase语句包含的是本页所列的测试语句,二者互斥。
testcase没有与return语句等价的语句。
测试语句不能出现在测试块之外,而label之外可以有其他Ren’Py代码。
testcase 语句可包含以下特性:
- description
描述该测试用例的字符串,会出现在测试报告中。
- enabled
若该表达式结果为
False,则跳过该测试。默认值为True。该特性可用于按条件禁用测试,例如在不支持的平台上。
testcase windows:
    enabled renpy.windows
    ...

testcase not_on_mobile:
    enabled not renpy.mobile
    ...
详见 跳过测试用例。
- xfail
若该表达式结果为
True,表示预期该测试会失败;若确实失败,会将结果标记为xfailed而非failed。默认值为False。
testsuite语句
testsuite 语句用于将测试用例分组。测试套件可包含测试用例、其它测试套件以及hooks(见下)。
默认测试套件名为 global,若用户未指定则由Ren’Py自动创建。其中包含游戏中所有其它顶层测试套件和测试用例。
其特性与 testcase语句 相同。
hooks
testsuite 语句可包含以下hook:
- setup
在当前套件内所有其他测试运行之前执行的test语句块。
- before testsuite
在当前套件内每个测试套件运行之前重复执行的test语句块。
- before testcase
在当前套件内每个测试用例运行之前重复执行的test语句块。
- after testcase
在当前套件内每个测试用例运行之后重复执行的test语句块;即使测试用例失败或抛出异常也会执行。
- after testsuite
在当前套件内每个测试套件运行之后重复执行的test语句块;即使测试套件失败或抛出异常也会执行。
- teardown
在当前套件内所有测试运行之后执行一次的test语句块;即使有测试失败或抛出异常也会执行。
before * 与 after * 类型的hook可能包含以下特性:
一次测试的生命周期
本节说明测试用例与测试套件的执行顺序以及hook的调用方式。 以下示例用于说明:
代码 |
执行顺序 |
|---|---|
label test_demo:
    "This is a demo for testcases."
    "It has a few messages and a menu."
    menu:
        "First Choice":
            "Selected first choice."
        "Second Choice":
            "Selected second choice."
        "Third Choice":
            "Selected third choice."
    return

testsuite global:
    setup:
        $ print("global :: setup")
        skip until screen "main_menu"

    before testsuite:
        $ print("global :: before testsuite")
        if not screen "main_menu":
            run MainMenu(confirm=False)
        click "Start"

    before testcase:
        $ print("global :: before testcase")

    after testcase:
        $ print("global :: after testcase")

    after testsuite:
        $ print("global :: after testsuite")

    teardown:
        $ print("global :: teardown")
        exit

    testsuite basic:
        testcase first_testcase:
            $ print("basic :: first_testcase")
            advance

    testsuite test_choices:
        setup:
            $ print("test_choices :: setup")

        before testcase:
            $ print("test_choices :: before testcase")
            run Jump("test_demo")
            advance until screen "choice"

        after testcase:
            $ print("test_choices :: after testcase")

        teardown:
            $ print("test_choices :: teardown")

        testcase choice1:
            $ print("test_choices :: choice1")
            click "First Choice"

        testcase choice2:
            enabled False
            $ print("test_choices :: choice2 (disabled)")
            click "Second Choice"

        testcase choice3:
            $ print("test_choices :: choice3")
            click "Third Choice"
|
global :: setup global :: before testsuite global :: before testcase basic :: first_testcase global :: after testcase global :: after testsuite global :: before testsuite test_choices :: setup global :: before testcase test_choices :: before testcase test_choices :: choice1 test_choices :: after testcase global :: after testcase global :: before testcase test_choices :: before testcase test_choices :: choice3 test_choices :: after testcase global :: after testcase test_choices :: teardown global :: after testsuite global :: teardown |
注意,即使测试用例位于嵌套的测试套件中, global :: before testcase 和 global :: after testcase 仍会在每个测试用例之前或之后执行。
要限制hook的作用范围,可设置其 depth 特性。设为 0 时,hook仅对包含自身的测试套件内的测试生效。
例如:
testsuite global:
    before testcase:
        depth 0
        $ print("Starting a testcase.")
若要让hook作用于嵌套的测试套件和测试用例,可将其 depth 设为 -1 (无限深度)或正整数(指定深度)。
Note
测试套件执行完毕后,游戏不会自动关闭,而是将控制权交还玩家并等待输入。
若要在测试套件结束后关闭游戏,可在该测试套件的 after hook中使用 exit 测试语句。例如:
testsuite global:
    after:
        exit
跳过测试用例
若某测试用例被设置为跳过,则不会执行该测试;该测试套件的 before testcase 和 after testcase 设置的hook也不会执行对应的测试用例。
若某测试套件内 所有 测试均被设置为跳过,则其 setup 和 teardown hook也不会执行。
父测试套件的 before testsuite 和 after testsuite 也不会执行。
参数化测试
通过 parameter 特性,可使一个测试用例使用不同参数多次运行。
方法为,指定变量名和对应的取值列表。测试时会使用列表中每个值各运行一次。例如:
testcase click_buttons:
    parameter button_name = ["Load", "Save"]
    click expression button_name
上述测试将运行两次,先点击“Load”按钮,再点击“Save”按钮。
设计参数时需要考虑多个测试套件或测试用例的情况,以及对应的多个hook(包括 setup 和 teardown)每次运行使用的值。
每次运行都会执行 before testcase 和 after testcase hook,且测试报告中会分别列出运行结果。
参数分组
可将多个变量用括号分组,并给出多组取值列表,从而一次指定多个变量。例如:
testcase addition:
    parameter (x, y, z) = [ (1, 2, 3), (2, 3, 5), (3, 5, 8) ]

    assert eval (x + y == z)
将运行三次,每次使用一组值: ``(x=1, y=2, z=3)`` 、 `(x=2, y=3, z=5) 、 (x=3, y=5, z=8)。
多个参数的组合
若存在多个 parameter 特性,测试将使用所有取值可能的组合各运行一次。例如:
testcase combinations:
    parameter a = [1, 2]
    parameter b = [3, 4]
    parameter c = [5, 6]

    assert eval (a + b + c in [9, 10, 11, 12])
将运行八次,对应 (a, b, c) 的所有组合。
可混合使用分组参数与单变量参数。例如:
testcase mixed:
    parameter a = [1, 2]
    parameter (b, c) = [ (3, 5), (4, 6) ]

    assert eval (a + b + c in [9, 10, 11, 12])
会运行四次,分别使用这些组合:
(1, (3, 5)),(1, (4, 6)),(2, (3, 5)),(2, (4, 6))
使用表达式中的参数
创作者可以在任何接受表达式的测试特性中使用参数。
例如,以下测试会运行三次,每次使用不同的 x 值。
当 x 为0或1时测试通过,当 x 为2时预计失败(xfail):
testcase choice_test:
    parameter x = [0, 1, 2]
    xfail x == 2

    assert eval (x < 2)
也可使用参数名称来选择界面或按钮。例如以下测试会根据 choice_text 的值点击“first”或“second”选项:
testcase show_menu:
    parameter screen_name = ["preferences", "load"]

    $ print(f"Showing screen '{screen_name}'")
    run ShowMenu(screen_name)
    pause until screen screen_name
    run Return()
参数可以跟在 expression 后面,用于根据参数名选择一个按钮。
testcase click_buttons:
    parameter button_name = ["Load", "Save"]

    click expression button_name
参数也可在Python代码块中使用。例如,以下测试会打印当前 x、 y 的值,并以此作为坐标并点击对应位置:
testcase param_test:
    parameter (x, y) = [(0.0, 0.0), (0.5, 0.5), (1.0, 1.0)]

    $ print(f"Clicking at position ({x}, {y})")
    click pos (x, y)
参数化的测试套件
测试参数也可以直接应用于整个测试套件。此时套件内所有hook和测试用例会使用每组参数各运行一次。
每次参数化运行都会执行 setup、 before/after testsuite 和 teardown hook。
例如:
testsuite math_tests:
    parameter (x, y, z) [ (1, 2, 3), (2, 3, 5), (3, 5, 8) ]

    setup:
        $ print(f"Running math tests with x={x}, y={y}, z={z}")

    testcase addition:
        assert eval (x + y == z)

    testcase multiplication:
        assert eval (x*y == z*y - y*y)
参数可以嵌套,所有参数组合都会被测试。例如:
testsuite parameter_field:
    parameter choice_text = ["first", "second"]

    testcase param_test2:
        parameter (x, y) = [(0.0, 0.0), (0.5, 0.5)]

        advance until screen "choice"
        click choice_text
        click pos (x, y)
Warning
参数按引用传递。若修改可变参数(例如列表或字典),则共享同一对象的其他测试也会受到影响。
异常和失败处理
若在运行测试用例期间发生错误:
该测试用例立即停止执行。
包含该测试用例的测试套件的
after testcasehook 会执行。若还有其它测试用例,会继续执行其他测试用例(包括
before testcasehook)。若没有更多测试用例,则执行该测试套件的
afterhook。
若在hook执行期间发生错误(例如 before testcase):
该测试套件立即停止执行。
若该套件由另一套件调用,父套件会继续执行。
若不存在父套件,游戏将结束测试。
测试报告
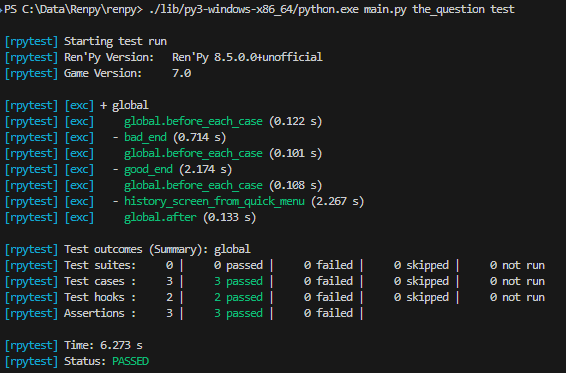
测试结束后,将结果输出到控制台,列出所有测试用例及其结果。若启用了 --print_details 选项,报告中会包含每项测试的详细信息。
以下是成功测试“The Question”后的测试报告示例:
测试结果
一项测试可能得到的结果如下:
Passed:测试成功,没有任何错误。
Failed:已执行测试,但某条语句失败。
XFailed:测试按预期失败(其
xfail为True且确实失败)。XPassed:测试预期失败(
xfail为True),却通过测试。Skipped:测试被跳过(
enabled为False或存在only True的其它测试)。
通常,passed或xfailed视为成功,failed或xpassed视为不成功。
测试设置
以下配置项可用于修改测试行为:
- _test.maximum_framerate
该项是一个布尔值。用于指定是否在测试时使用最大帧率模式。解锁后帧率可能会超过显示器刷新率。 默认值为
True。
- _test.timeout
该项是一个浮点数。用于指定单条测试语句等待条件满足的最长时间(秒)。默认值为
10.0。可在支持
timeout的语句(如assert、until)上单独指定超时时间并覆盖该值。
- _test.force
该项是一个布尔值。用于指定是否在
renpy.config.suppress_underlay为True时仍强制继续测试。默认值为False。
- _test.transition_timeout
该项是一个浮点数。用于指定等待转场完成的最长时间,单位为秒。若超时则跳过转场继续测试。默认值为
5.0。
- _test.screenshot_directory
该项是一个字符串。用于指定截图保存目录。默认值为
tests/screenshots。
测试语句
测试语句是测试用例的基础结构,大致分为三类:命令语句、条件/选择器语句、控制语句。
基本命令
advance语句
Type: Command
- advance
使游戏推进到下一行对话。
advance
advance until screen "choice"
exit语句
Type: Command
- exit
不弹出确认界面直接退出游戏,退出前不存档。
if eval need_to_confirm:
    # 弹出确认界面,若 config.autosave_on_quit 为 True 则自动存档。
    run Quit(confirm=True)

if eval persistent.quit_test_using_action:
    # 不弹出确认界面,若 config.autosave_on_quit 为 True 则自动存档。
    run Quit(confirm=False)

exit # 不弹出确认界面,退出前不存档。
pass语句
Type: Command
- pass
不执行任何操作。占位用,用于空测试用例。
testcase not_yet_implemented:
    pass
pause语句
Type: Command
- pause [time (float)]
根据指定的时间暂停测试。暂停持续时间单位为秒。与 pause语句 类似,但必须给出时间。作为 until 子句时可以不写时间。
pause 5.0
pause until screen "inventory"
run语句
Type: Command
- run <action>
执行指定的 界面行为 (或行为列表)。
当包含该行为(或行为列表)的按钮变为可点击时继续。
testcase chapter_3:
    run Jump("chapter_3")
skip语句
Type: Command
- skip [fast]
使游戏开始快进。若当前在菜单中则先返回游戏,否则仅开启快进。
If fast is provided, the game will skip directly to the next menu choice.
若启用 fast,将直接快进到下一个选项。
skip
skip fast
skip until screen "choice"
鼠标命令
click语句
Type: Command
- click [button (int)] [selector] [expression (expr)] [pos (x, y)]
在屏幕上执行模拟点击。可选特性如下:
button指定模拟鼠标的哪个按键。该项是一个整数,默认值为1。 1为左键,2为右键,3为中键,4和5为部分鼠标的额外按键。Ren’Py通常只响应 1 和 2。expression指定一个测试表达式,用于标记点击目标。其遵守 pattern使用从句的规则。
若指定了 selector 和/或 pos,会先按 move语句 的规则移动虚拟测试鼠标再发送点击。
使用 通配符 子句的点击行为,若未指定 pos,click语句会寻找“中性”位置,使点击不会落在可获得焦点的元素上。
# 点击鼠标当前位置。
click

# 点击带有指定文本的按钮。
click "Start"

# 鼠标右键点击指定目标。
click id "inventory_button" button 2

# 点击指定目标中心。
click id "inventory_button" pos (0.5, 0.5)

# 点击使用表达式指定的目标。
$ button_name = "Load"
click expression button_name
drag语句
Type: Command
- drag <[selector] [pos (x, y)]> to <[selector] [pos (x, y)]> [button (int)] [steps (int)]
模拟屏幕上的鼠标拖拽。可选特性如下:
拖拽起点(
to之前),可使用selector和/或pos特性,与 move语句 的规则相同。拖拽终点(
to之后),同样可使用selector和/或pos特性,与 move语句 的规则相同。button指定拖拽使用的鼠标按键。该项是一个整数,默认值为1。steps指定拖拽中间步数。该项是一个整数,默认值为10。步数越多越平滑但更耗时。
drag id "item_icon" to id "inventory_slot_3" button 1 steps 20
drag pos (100, 200) to pos (400, 500) button 1
drag id "item_icon" pos (0.5, 0.5) to pos (300, 400) steps 5
drag pos (50, 50) to id "inventory_slot_1"
drag pos (50, 50) to pos (150, 150)
move语句
Type: Command
- move [selector] [pos (x, y)]
将虚拟测试鼠标移动到屏幕上的指定位置。
If a selector is given, and:
若指定了 selector:
若指定
pos,该项是一个相对于选择器的坐标,鼠标移动对应坐标。若未指定
pos,会尝试找到点击后可使该选择器获得焦点的像素。该项也会参考其他东西,比如focus_mask等。
If no selector is given, and:
若未指定 selector:
若指定
pos,该项是一个相对于屏幕的坐标,鼠标移动对应坐标。若未指定
pos,会抛出错误。
# 移动到 `back_btn` 内的随机可点击点
move id "back_btn"

# 移动到 `back_btn` 的中心点
move id "back_btn" pos (0.5, 0.5)

# 移动到距离 `back_btn` 的左上角右侧20像素下方10像素的位置。
move id "back_btn" pos (20, 10)

# 移动到屏幕的右上角
move pos (1.0, 0.0)

# 移动到距离屏幕的左上角右侧20像素下方10像素的位置。
move pos (20, 10)
scroll语句
Type: Command
- scroll [amount (int)] [selector] [pos (x, y)]
Simulates a scroll event. It takes the following optional properties:
模拟滚动事件。可选特性如下:
amount表示滚动“格数”。该项是一个整数,默认值为1。正数向下滚动,负数向上滚动。若指定了
selector和/或pos,会先执行 move语句 移动鼠标再发送滚动。scroll “bar” scroll id “inventory_scroll” scroll amount 10 id “inventory_scroll” pos (0.5, 0.5) scroll # 向下滚动到当前鼠标位置
Note
仅模拟鼠标滚轮事件;也可考虑使用 界面行为(action)、值(value)和函数 中的Scroll行为。
run Scroll("inventory_scroll", "increase", amount="step", delay=1.0)
键盘命令
keysym语句
Type: Command
- keysym <keysym> [selector] [pos (x, y)]
模拟键盘按键事件,包括 config.keymap 中的键位。
若指定了 selector 和/或 pos,会先执行 move 语句 移动鼠标再发送按键命令。
keysym "skip"
keysym "help"
keysym "ctrl_K_a"
keysym "K_BACKSPACE" repeat 30
keysym "pad_a_press"
type语句
Type: Command
- type <string> [selector] [pos (x, y)]
将给定字符串模拟键盘方式输入。
若指定了 selector 和/或 pos,会先执行 move 语句 移动鼠标再发送文本。
type "Hello, World!"
条件语句
条件语句用于判断某前提条件是否成立。用于接受条件的测试语句有 if、 assert、 until。
布尔值
测试中可根据需要使用布尔值 True 和 False。这两个值可以直接使用。
if True:
    click "Start"

if False:
    click "Settings" # 不会执行这条,因为判断条件始终为False。
布尔运算
条件语句支持 not、 and、 or 运算符。表达式外层可加括号也可不加。
assert eval (renpy.is_in_test() and screen "main_menu")
advance until "ask her right" or label "chapter_five"
click "Next" until not screen "choice"
eval语句
Type: Condition
- eval <expression>
根据给定的Python表达式计算结果。仅用于 assert、 if、 until 等接受条件的测试语句内部。
assert eval (renpy.is_in_test() and ("Ren'Py" in renpy.version_string))
Note
带$符号的单行Python语句与eval语句的区别:
eval 不能单独成行,必须放在
if、until等语句内;带$符号的单行Python语句是单独一行。带$符号的单行Python语句可执行任意Python语句(不必有返回值,如
$ import math);eval语句必须有返回值。
label语句
Type: Condition
- label <labelname>
检查上一条执行的测试语句是否已到达指定的Ren’Py脚本标签。
参考下例:
run Jump("chapter_1")
assert label chapter_1 # 成功
assert label chapter_1 # 失败
第一条 assert 语句成功是因为上一条语句 run Jump("chapter_1") 正好到达指定脚本标签 chapter_1。
第二条 assert 失败是因为自第一条 assert 语句之后,未再次到达指定脚本标签 chapter_1。
因此下例不会得到成功的结果:
run Jump("chapter_1")
advance repeat 3
assert label chapter_1 # 失败
(译者注:测试label语句应该只在具有分支选项的测试后面使用,用于确认分支走向符合预设剧本。)
选择器语句
选择器语句用于判断某元素是否显示在当前屏幕上,并用于后续操作。
选择器是一类特殊的条件语句。
可视组件选择器
Type: Condition, Selector
检查指定id的界面或元素是否当前已显示。
其可使用以下特性:
- screen <name>
要检查的界面名称。
- id
要检查的元素id。
- layer
界面所在图层。未指定图层时根据界面名称自动确定。
if screen "main_menu":
    click "Start"

advance until id "inventory_viewport" layer "overlay"

click "Close" until not id "close_button"
文本选择器
Type: Condition, Selector
- "<text>" [raw]
- expression <expression> [raw]
text 选择器接受一个字符串,表示需要在屏幕上寻找的目标。
寻找方式是遍历所有可获得焦点的元素(通常是按钮和主对话文本框),查找它们自身的文本和 alt 特性文本。
搜索时不区分大小写且取最短匹配。
例如,搜索 "log" 且屏幕里有 "CATALOG" 和 "illogical" 时,会匹配到 "CATALOG"。
若指定了 raw,在脚本原文内搜索,在多语言处理与 插值 之前。
否则在屏幕上显示的文字上搜索,在多语言处理与 插值 之后。
若指定了 expression,则会根据表达式计算结果字符串决定待搜索目标。
# 这段文字可能会出现在按钮上
skip until "Start Game"

# 这段文字可能会出现在主对话文本框中
advance until "Hey, that's not fair!"

# 不区分大小写的搜索
assert "AsK HeR RighT AwaY"

# 搜索未插值的文本
assert "Welcome, Eileen!"
assert "Welcome, [player_name]!" raw

# 在修改语言后,搜索未经多语言处理的文本
run Language("japanese")
assert "スタート"
assert "Start" raw
控制语句
控制语句用于控制测试执行流程。
assert语句
Type: Control
- assert <condition> [timeout (float)] [xfail (bool)]
该语句接受一个条件语句,执行时遇到前提条件不满足则抛出 enpyTestAssertionError。
若指定了 timeout,等待对应秒数就是前提条件;如果前提条件超时则该语句执行失败。
若 xfail 设置为 True,表示预期assert语句执行失败。
这样该语句是否成功与条件是否满足的结果相反。如果前提条件满足,该语句执行失败;反之则成功。
assert screen "main_menu"
assert eval some_function(args)
assert id "start_button" timeout 5.0
See also
for语句
Type: Control
- for <variable> in <iterable>
该语句会对所提供可迭代对象中的每一项执行一段test语句块。
使用 break 和 continue 语句可以控制循环流程。
样例:
# 点击“Next”三次。
for _ in range(3):
    click "Next"

# 依次点击每一个选项。如果商店未解锁则跳过点击“Trade”选项。
for choice in ["Talk", "Trade", "Leave"]:
    if eval (choice == "Trade" and not persistent.shop_unlocked):
        continue
    click expression choice
    if screen "shop":
        break

# 点击stats界面的每一个标签。如果任务系统未解锁则跳过点击“Quests”标签。
for stat_tab in ["Stats", "Skills", "Quests"]:
    click expression stat_tab
    if eval (stat_tab == "Quests" and not persistent.quests_enabled):
        continue
    assert text stat_tab timeout 2.0
if语句
Type: Control
- if <condition>
当指定条件满足时执行其内部的测试语句块。
样例:
if label "chapter_five":
    exit

if eval (persistent.should_advance and i_should_advance["now"]):
    advance
elif 和 else 语句可为 if 语句添加分支。
if eval persistent.should_advance:
    advance
elif eval i_should_advance["now"]:
    advance
else:
    click "Start"
repeat语句
Type: Control
- <command> repeat <number> [timeout (float)]
将某条语句重复执行指定次数。
repeat 左侧的内容是需要执行的语句,右侧是重复次数。
click "+" repeat 3
keysym "K_BACKSPACE" repeat 10
advance repeat 3
screenshot语句
Type: Command
- screenshot <path> [max_pixel_difference (int or float)] [crop (x, y, width, height)]
对当前画面截图并保存到指定路径。
path:保存路径(与_test.screenshot_directory的相对路径),可含扩展名,仅支持.png。max_pixel_difference:与已有截图允许的像素差异数(整数)或比例(浮点),默认为0。crop:裁剪区域(x, y, width, height),坐标必须为整数。
若项目在git仓库中,当前提交的哈希会自动追加到文件名(如 @{hash}.png),便于开发者追踪截图变化。
若文件已存在,会将当前截图与已有文件比较。差异超过 max_pixel_difference 设置的像素数会抛出RenpyTestScreenshotError。
若要覆盖已有截图,可删除文件或在运行测试时使用 --overwrite_screenshots 命令行选项。
screenshot "screens/main_menu.png"
screenshot "screens/inventory" max_pixel_difference 0.01
screenshot "button.png" crop (10, 10, 100, 50)
参数化测试中可以使用多张截图:
testcase screen_tester:
    parameter screen_name = ["inventory", "stats", "map"]

    run Show(screen_name)
    screenshot f"screens/{screen_name}.png"
until语句
Type: Control
- <command> until <condition> [timeout (float)]
重复执行某个语句直到满足预设条件。由 until 连接左右两侧,左侧是重复执行的语句,右侧是条件。
当右侧条件满足时进入下一条语句。否则不断重复执行左侧语句直到条件满足。
若指定了 timeout,会在对应时间内等待条件满足,单位为秒。
如果超时仍未满足则抛出RenpyTestTimeoutError。
该超时会暂时覆盖全局 _test.timeout。
advance until screen "choice"
click "Next"
advance until label "chapter_5"

skip until screen "inventory" timeout 20.0
while语句
Type: Control
- while <condition>
该语句会在提供的条件(condition)满足时不断执行一段test语句块。
使用 break 和 continue 语句可以控制循环流程。
样例:
$ should_advance = True
while eval should_advance:
    advance
    if screen "main_menu":
        break

    $ should_advance = some_evaluation_function()
Python语句块和带$符号的单行语句
测试用例内可加入 python语句块 或 带$符号的单行语句。
与普通Ren’Py代码不同,这里的Python语句块不接受 in substore 参数,但可使用 hide 关键字。
二者都可执行任意Python语句。
init代码会在测试运行前执行,因此 init python 中定义的函数和类可在测试的Python语句块和带$符号的单行语句中调用。例如:
init python in test:
    def afunction():
        if renpy.is_in_test():
            return "test"
        return "not test"

testcase default:
    $ print(test.afunction()) # 在控制台输出结果